 Go Home
Site Map
Rear Brake Service
Warning! Do Not replace the lock nut on the hand brake screw with a regular nut! You must use the special lock nut that that was made for these screws. If that nut falls off, the caliper will fail and may jam the pads against the rotor. Lock Washers are not acceptable replacements.
This page was written for 1984 to 87 Fiero. The same piston design was uses 88 but the caliper and seals are different. Do not use any parts made for 84-87 caliper to fix an 88 caliper.
The rear caliper on 84-87 Fiero is rather complicated hardware, and while this article doesn't cover the 88 specifically, it should help most people with an 88 cars. It is no wonder many people are confused and even intimidated by it. To add to that there are two versions of piston used. This page explains how they are built and what is going on inside them. It also covers why the rear brakes regularly refuse to self adjust like they were designed to.
Any Parts, Seals, Washers, etc, are missing?
You must replace the missing part(s) before any work is done, including fixing Parking Brake or adjusting pad clearance.
Any missing part will cause problems.
Tips
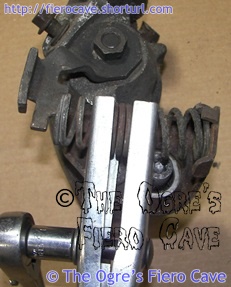 If you have the door hinge spring compressor tool... That makes reinsatalling the parking spring on the caliper much easier.
Just compress the spring that easily fits and a off center. Leftover can fit over the cable jacket end part at the bracket.
Remove brake cables, try:
Clean out rust/dirt and use close end wrench or tubing to compress the ears.
Tight areas then likely need to break the ears. If you're reuse them, on frame end use hose clamp the end will stay put.
Inner Pad Retainer
If the clip that holds the inner pad against the piston is damaged or missing then it must be replaced. If it's not there then the pad will drag the rotor. It could heat up the rotor and cause warping. In any case you will have accelerated wear of the parts. The clip does more than prevent pad rattle.
If the pistons in you calipers don't have the notches for the pad clip then carefully pry the clip onto the piston. I do this by getting three of the ears over the piston then prying then 4th ear into place. Try not to bend the ears.
The part of the clip that holds the pad has two ears cut sharp and two ears with bent tips. The pads are easier to seat in the clips if the bent tips are toward the open side of the caliper. Push the pad into the sharp ears then snap the bent ones in place.
Actuator Seal/Washer
Actuator has 2 seals, one to hold pressure and one is a dust boot. Thickness of dust boot seal keeps dirt out, takes up slack and gives room for thermal cycles. (Aluminum caliper and steel actuator & lever.... Different metal needs different thermal property, IE needs room to grow/shrink.)
The dust boot seal has a indent for thin plastic washer that fits in.
Goes on actuator in order... seal with indent toward lever, plastic washer,
plastic washer, seal with indent toward caliper, lever, nut. (Soucre: 87FSM)
Note: Apparently I'm told the 88 has a dust boot that doesn't have a thin plastic washer. Its covered in Teflon and use it without the plastic washer. (Source: this thread in PFF.)
To compress the piston into the caliper...
If this method will not work then either the actuator screw is binding or the piston is damaged. You need to repair or replace the affected caliper as soon as possible.
GM DOES NOT recommend the use of piston rotation to retract the piston into the caliper in the 84-87 Fiero. Only 88 model Fiero pistons should be retracted by rotating the piston.
Notice that the C clamp do not rotate/turn/whatever the Piston! It makes the actuator spin when the piston is push. The socket, # 3 below, is only a spacer. If C clamp is very hard to turn or the piston rotates, more that a couple degrees, then something is wrong. Bad parts need replace.
- Work the hand brake lever on the caliper to make sure the actuator screw rotates freely. If the lever binds loosen the nut 1/4 to 1/3 turn and try it again. Don't force the lever. You can damage the screw or the caliper shell. The lever can bind from corrosion between it and the caliper. It's also possible for the screw to bind in the caliper. If the screw is jammed in the caliper then the caliper must be rebuilt or replaced.
- Remove the hand brake lever from the caliper. Don't loose the plastic washer between the lever and seal.
- Cover the actuator screw with a large socket to protect it. The socket MUST NOT touch the screw or seal!
- Use a large C clamp to compress the piston. Position the clamp to load on the socket covering the actuator screw. As the piston compresses the screw will rotate under the socket. Do Not allow the clamp to damage the plug in the piston face! If need be, protect the piston with a wood block.
- Clean away any corrosion build up around the actuator screw and on the lever. Especially on the side of the lever facing the caliper.
- Reassemble the lever. Don't forget to put the plastic washer back between the lever and seal. The washer protects the seal from wearing against the lever. Coat the area where of the lever facing the caliper with silicone brake grease. DO NOT use petroleum products!
Here are pictures of how to position the clamp. If your clamp is in rough shape, use a block of wood or old brake pad to protect the face of the piston. I know some of you have clamps that are in fairly bad shape... Trashy clamps can damage the piston or the plastic plug in the old style piston.
Retract the piston how far?
Just bottom them out... Not sure when there bottom out or have suspect piston? See clamp images at bottom.
Rotating Pistons to retract them
For safety, I have to recommend that the clamp method be used to push in the pistons regardless of type. I've tried both methods. I thought it took way more force to rotate a Fiero caliper than most of the others I've done. Most rotate and retract fairly easy. That set off alarm bells and sent me looking for the "official" method.
There are definite issues with piston rotation.
- It's confusing to allot of people. Each piston has to be turned a different direction to retract. Someone invariably turns one the wrong way.
- The inner and outer pistons have no indexing. People have had difficulty getting the outer piston to grip the inner one tight enough to retract when they turn it.
- If you aren't careful, you could tear the dust seal. The dust seal keeps water and dirt out of the vent hole in solid faced pistons.
- The holes in the piston face are often worn because people run them without the pad clip on them... When that happens the clamp or big pliers are your choices and pliers can really chew up the pistons.
I won't claim the clamp method is perfect. It's kind of a pain the in ass but it does solve the above issues. It also forces people to check over the actuator screw and arm.
Rear Brake Adjustment
Warning! Many "Rebuilt" calipers are bad right out of the box because many are using rebuild or used pistons. If they won't self-adjust then return them. Problem will only get worse.
Parking brakes should self-adjust but often don't. GM said the rear disk brakes require periodic use of the hand brake to maintain proper adjustment. I'm not going to try to explain why. It's just the way they are built. (It's essentially a design problem.)
If you are having problems with the rear brakes then always try cycling the brake handle three or four times before tearing them apart. If the hand brake system is broken, disconnect the cables and try moving the levers with Vise Grip or other large pliers.
If you still have low pedal after rear brake work, try this adjustment procedure. The adjustment won't cure low pedal caused by MC or Power Booster problems.
Low Pedal is when the brakes seem to work properly except the pedal travel is longer than normal. As opposed to Spongy Pedal that is nearly always a bleeding issue. When Fiero brakes are setup and working like they should be, the pedal will "go solid" before reaching the same plane as the gas pedal resting position.
My rear brake won't "lock up..."
Most people think rear brake lockup is good... wrong. Almost all cars are bias to front.
Lockup in back can spin the car. GM etc set brake so the car will not spin out for back brake lockup.
Think:
- Car weight shift to back in burnout. Needs bigger tire in back...
- Car weight shift to front when stopping. Needs more brake in front.
And Higher speed = more weight shift to front when stopped!
But my car as X weight in front and Y in back...
Car has Two weights...
- Static Weight. Car is not moving... Think curb weight.
- Dynamic Weight. Car is moving, stopping, accelerate, etc. Weight can shift front, back, sideways, etc. This is weight the brake system and suspension sees.
Fiero weight is 50/50 (aprox) normally but in panic stop weight shift to 80/20 (front/rear) or more... In FWD car, panic stop weight shift to 90/10 plus...
Doesn't matter what vehicle involve. Car, even a bicycle, get weight shift toward front in stopping. (You can tell nube cyclist. Uses back brake only or over brake in front and goes over steering bar...)
Think Mid engine Fiero has different rule? Not. Is a Physic Rule... Even Porsche mid/rear engine have front bias on most models.
Disproportion valve
Most OE prop valve doesn't work in most stopping, only use in panic stop settings. Most people think all bias is done by a valve but their wrong most times. Prop valve think regulator and activate until 500-900PSI from MC. Prop valve doesn't activate in normal use. Many other ways to give you Bias, Fiero and most GM models included. In OE Fiero case, Hydraulic only will give you Bias. If only valve give you Bias then when valve is dead, Bias is dead... and likely only warning is car get spinning around.
Advantage OE prop solution is no valve to blow up. Car has "natural" bias without a valve to die.
Why using a valve only in panic stops?
Think ABS only older... Rear line pressure in high but traction in low. Easier to spin on panic stop when no valve... Remember... Weight shift to front in braking. In panic stop, weight in back is low, very low...
Many truck and van calls ABS is actually just an adjustable valve in rear brake circuit...
(Anyone using an aftermarket prop valve to make-up for bad design is waiting for time bomb to blowup, like most with GA in rear only...)
Parking Brake (Hand or "Emergency" Brake)
Warning! The actuator arms and return springs must be installed on the calipers for proper operation. This applies even to cars where the cables have been removed.
Warning! You must use the special locking nut that that was made for the actuator screw! If you lost it then it must be replaced with another locknut.
Decouple the cables
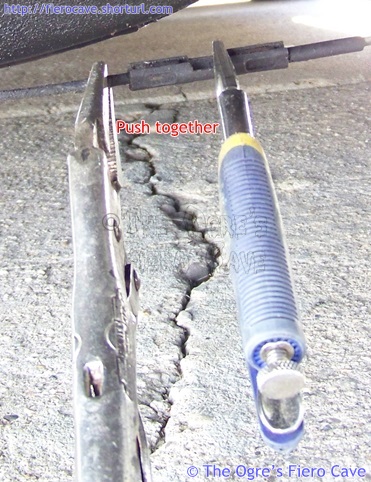 Is easy doing this...
Clean the coupler, lube if needed.
Need two VISE-GRIP tools, one on the cable and the other on the coupler in the picture shown.
Let "screw end" of then to hit each other.
Squeeze the tips toward center.
Adjusting cables
Short version: Both levers at stops on caliper body, the handle should move 5-8 click after finish adjusting. Source: 87 FSM
Official version: 87 FSM Cable adjustment, Page 5B8-3. (Most don't bother removing the wheels.)
1. Apply service brake pedal three
times with a pedal force of approximately 778 N (175 lbs.).
2. Apply and release parking brake three times.
3. Raise car and suitably support.
● Mark relationship of wheel to axle flange.
4. Check parking brake hand lever for full release.
● Turn ignition on.
● "BRAKE" warning lamp should be off. If "BRAKE" warning
lamp is still on, and the hand lever is completely released, pull downward on
the front parking brake cable to remove slack from lever assembly.
5. Remove rear wheels and tires.
● Reinstall two inverted lug nuts to retain rotor.
6. Parking brake levers (2) on both calipers should be against the lever stops
on the caliper housings. If levers are not against stops, check for binding in
rear cables and/or loosen cables at adjuster until both left and right levers
are against their stops.
7. Tighten parking brake cable at adjuster until either the left or right lever
begins to move off the stop then loosen adjustment until lever moves back
barely touching stop.
8. Operate parking brake several times to check adjustments. After cable
adjustment, the parking brake hand lever should not travel more than 8 ratchet
clicks. Rear wheels should not rotate forward when hand lever is a plied 5 to 8
ratchet clicks.
9. Install wheels and tires, align previous marks.
● Remove lug nuts securing the rotor to the hub.
● Lower car.
● Torque lug nuts.
Who cars about a nut...
If that nut comes off the actuator screw, the caliper can fail. It's that simple.
I need the return springs? Even with no cables?
Yes! In addition to needing the arm to perform adjustments, the arms and springs eliminate random movement of the actuator screw. Random movement of the arm/screw can bind the pads against the rotor or allow too much pad clearance.
Did your hand brake stop working after repairs to the rear calipers?
It may be that the levers in the calipers are binding. This keeps them from moving through the full operating range. You can usually pull the handle OK, but the spring at the caliper cannot push the lever all the way back when handle is released. This keeps the screws from turning enough to move the piston guts.
First off, did you put brake grease actuator arm? If not take them off, clean them, and then coat the side facing the caliper with brake grease. Doing that will lube them and prevent corrosion.
Next check the cables. You may have broken a week cable jacket while working on a caliper.
If the arms/cables are working ok and returning to the stops like they should, your problem may be too much clearance in the caliper. Try the caliper adjustment procedure above.
After use Parking Brake, Brake Light is stuck On or comes On at next bump...
(Chime unit activating even when touching the brake handle and Key is on? Check brake light in the dash too. )
Do not adjust anything first!
Try this...
You release Parking Brake Handle while a helper pulls hard on parking brake cable under car.
Warning: Make sure the levers on both calipers return to the stop. Otherwise the pads can drag on the rotor. Can wreck the brakes and even cause a fire.
Why does it work?
Parking brake switch is not on handle section... It's on Ratchet section in the handle assembly and needs cable tension to work.
Cause?
Parking brake subsection needs work, usually a bad caliper/piston and/or cables.
Parking Brake vs. Emergency Brake
Many OEM use "Emergency Brake" but FMVSS use "Parking Brake" with a good reason, the tests for this subsystem are done only when car is stopped.
Read testing on the subsystem. (See FMVSS link on Links page.)
In short: Park nose down, test, Car must not move. Park nose up, test, Car must not move.
571.105 Section 5.2.1 thru 5.2.2.3, Passing Test is 30% grade for 5 minutes. 30% grade is 16.7°.
571.135 Section 7.12.2, Passing Test is 20% grade for 5 minutes. 20% grade is 11.31°. (An easier test to pass.)
105 was used for Fiero. I list both Standards just for information when compairing new cars. 135 first published on Feb. 2, 1995.
The result is Parking brake design is to holding a car on a very small hill. Not for stopping! In Fiero case, and all new parts, it will work for a test and maybe longer. Sadly this means the "Emergency brake" is not made to do any stopping and When anything is wrong w/ the brakes, even worse. You can stop but you need over a Football field of room to stop at 60 MPH.
For more "proof" just read any Owner's Manual... (I'll stay with Fiero but any OM says about same.)
Fiero Brake Spec are: (stopping distance from 60 MPH per 87 Owner's Manual)
- 192' stopping distance with max load. (Max load 401 lb. per label on car. GVWR 3124 lb for 87 Fiero Sport)
- 187' stopping distance with light load (light means driver weighing approximate 150 pounds)
- 334' stopping distance using emergency service brake with partially service break system failure (Almost double light load distance!)
- 302' stopping distance with brake power unit failure (brake booster failure)
In 1984, the Fiero was rated for a maximum load 187' and for light load 183' for stopping, likely because 84 has no V6 option and most used a different Combination Valve.
88 is better? Not really, 188' both loads, 320' parking brake. A bit Worse if booster failed, 308'. 88 main "feature" is vented rotors are less likely to fade. (Both per the Owner's Manual. Fiero OM and others only list "worse case" Brake performance/spec.)