 Go Home
Site Map
Beating The Bushings
There are lots of threads about bushings for the suspension and other parts of Fiero running around the forums... Here are a few things to keep in mind while considering what bushings to use and notes on how to install them once you decide.
Do I really need to change the bushings? They look ok...
If you still have OE control arm bushings you really need to get rid of them. Even if the car has low miles the rubber is going to be significantly degraded to completely rotten. The rubber rots whether you drive the car or not just from chemicals in the air much like metal rusting. You can't believe the difference a fresh set of rubber bushings makes and once you've seen it you won't believe the hype about Polyurethane.
If you haven't seen your bushings in a while you probably should and soon. Make sure you get UNDER the arms so you can see up into it where the bushings are. The bushings are all around 20 years or more old and even on a low mileage vehicle have aged and the rubber has become sloppy. Even when the rubber hasn't gone, the metal parts can fail in frightening ways due to rust. Remember that the bushings didn't get anti rust coating like the rest of the control arm. It is entirely possible for the arm to look great and the bushing metal to be rotted away.
Example: I've worked my way around the control arms on my 87. The rubber in the upper arm bushings was all shot. When unloaded there was as much as a 1/4 inch of play in them. The right LCA was bad but fairly tight. No obvious play but the rubber was cracking up where visible. The lower arm on the left was especially alarming... When I got it off I found that the front bushing's outer shell was mostly gone. Yes Gone. This is a generally low rust area for cars but that shell had rotted in a really ugly way. (My control arms look almost new there is so little rust on them.) There were two narrow collars where the metal passes thru the arm but most of what should have been between the holes was simply gone. After pulling the rubber out, which was insanely easy, I used a punch to cave in what was left and pulled it out with pliers.
Rubber vs. Polyurethane (And Other things...)
If you want a problem free daily driver, stay with rubber bushings for the control arms! Various people claim Poly can outperform OE but when you compare to current Moog parts I seriously doubt there is any measurable gain. The only good place for Polyurethane in Fiero suspension is the cradle on 84-87 models and maybe the anti sway bar.
First of all remember most people are comparing performance gains of the new bushings they install to the old worn bushings they replaced. This is a critical error because when the new bushing is compared to new OE rubber bushings a large portion of the advantage vanishes.
Does this mean that alternate bushings are never worth the effort or expense? Not at all. It means you have to consider the application allot more carefully than most people do. For example, 8shark offers (maybe offered as I don't know if they still make them) bushings that are intended to address specific racing issues by allowing more camber/caster adjustment than is normally possible in Fiero.
The Applications
In Fiero there are 4 areas that people are concerned about. I'll explain the "mode" column in a minute...
| Area | Mode | Main Alternate Materials |
|---|---|---|
| Control arms | Bearing (OE one is torsion) | Polyurethane or Bearing |
| Sway bar | Bearing and compression | Polyurethane |
| Engine | Compression | Polyurethane |
| Cradle | Compression | Polyurethane or Metal |
The mode a bushing operates in can be a little confusing. The table above lists the main mode of operation but there is usually more than one. The OE bushings in the control arms are a good example. These are mainly torsion bushings but get some compression as well when you hit a bump.
| The modes: | |
|---|---|
| Bearing | The inner and outer sections rotate freely. No limit to range of travel around axis. Move them as far as you want until you hit something. |
| Torsion | The inner and outer sleeves are fused to the bushing material. Limited range of travel. The bushing material winds up around the inner sleeve as the outer is rotated. Moving them beyond their designed range can ruin them quickly. (See Note Below.) |
| Compression | Bushing material is compressed or stretched. May look like torsion bushing in some applications but load doesn't rotate. |
Note: Many OE and aftermarket control arm bushings are not fused to the shell and sleeve and will not be ruined by installing the bushing with an unloaded suspension. The bushing will settle after the car is driven.
The Materials
Original Equipment bushings are nearly always vulcanized rubber compounds. They are inexpensive and require little or no maintenance over their life. They can be quickly ruined if not installed properly. (See Note Above.)
Solid metal bushings are just that. They are used to eliminate all the movement of the controlled item.
Bearings can be any number of things. They are usually expensive and may require allot of maintenance. Needle and sleeve loaded bearings are known to exist for the rear arms. ((No, I don't know who makes them. I don't pay that much attention to them. There are only a small number of people who would benefit from these.))
Polyurethane is a synthetic polymer. It is much stiffer than rubber and is relatively cheap. While much more resistant to chemicals than rubber, it may require significant maintenance dependant on what application it is used for.
Polyurethane Noise/Wear
When using polyurethane in control arms or other bearing applications, the issue of noise has a serious problem. What most people don't know the problem is not only a noise problem but a wear problem. Polyurethane in control arm application can hog out the inside without making any noise. Don't assume no noise = no wear. The poly manufacturers says using graphite in the polyurethane formula can reduce wear/noise issues but by how much? A year or two or five? OE rubber bushings in control arms last a decade or two by comparison.
Silicone Greasing can help. Inspect and re-grease the bushings every year at least. Doing an oil and lube job? A good idea to inspect your poly bushings in your control arms at that point. (Some grease hates polyurethane. The grease degrades the polyurethane over time. Lubing bushing treat polyurethane like brake work.)
The Details
The cradle on the 84-87 Fiero is mounted to the body in rubber bushings. This was a really bad idea that Pontiac corrected for 88. The rubber bushings allow the cradle to move, often in seemingly random ways, as the car corners or changes speed. (This problem will show up on manual transmission cars but an automatic can do it to.)
Polyurethane is very good for this application but solid metal is better. The idea here is to eliminate as much cradle movement as possible. On street driven cars polyurethane will do a wonderful job tightening the rear of the car. Racers will likely want solid metal. Polyurethane will require little or no maintenance in this application. This upgrade will drastically tighten the rear of the car. Do this upgrade before trying any of the other options. Drive the car a week then decide if the car needs further upgrade. This upgrade can result in need to realign the car but you'll be able to drive it well enough to decide what, if anything, else is needed before heading to the alignment shop. ((How much the alignment will change, if at all, depends on the condition of the original bushings.))
The anti sway bar has two different bushing types. The end link bushings are compression type and the center is primarily a bearing although it also gets large compression loads. Polyurethane bushings in this application will have the effect of installing a stiffer bar. The main problem here is the center bushings, which are pretty exposed to road grime and water. You'll get these bushings to squeak pretty easily unless you keep them clean and greased. Because they are rather exposed they aren't to big a deal to maintain.
I don't recommend most people install polyurethane engine or transmission mounts. You really want the compliance of the rubber here for most things to keep noise and vibration away. (Fiero has enough noise and vibration already.) Same for the torque reaction strut, AKA dog bone. Polyurethane here generally won't help a stock motor very much and can rattle the car allot. Where it can be useful is in engine upgrade setups or to solve problems like the torque strut issue described in another article here. In terms of engine to body vibration increase, the worst stock setups are the 4 cylinder with automatic. This motor can rattle your teeth loose at idle. The 4 cylinder stick isn't so bad because it has to be out of gear at idle. The V6s are smoother running motors so they aren't too horrible according to those I've talked to. NOTE: If you install the polyurethane "dog bone" it is critical the bolts be properly tightened. Failing to do so will damage the brackets. This has been a problem with many installations of aftermarket struts.
I've saved control arms for last because they are the most complicated. You have to consider 3 things for these bushings very carefully. (There is another article covering this in more detail.)
Is this a stock motor? Is this Front or Rear? Is this car mostly on the street or raced?
As I stated above OE rubber bushings need little maintenance. They really are best for the majority of applications. Other than having an installation quirk, which I'll get to in a bit, they are trouble free. They also absorb tremendous abuse. Where they can quickly become inadequate is in the rear control arms of cars with upgraded engines. The rubber can have too much play in it when used with upgraded V6 or V8 applications. This slack allows the rear alignment to change excessively during acceleration and can be a real handling problem.
Polyurethane tightens up the control arms but it can transmit noticeably more vibration to the frame. Unless installed very carefully and kept maintained these things will squeak. My feeling is that when you compare polyurethane to new OE rubber the improvement in handling isn't that great for most people. I wouldn't use poly on my car for street use. It's just not worth the headache to me.
The final option in the rear arms is to use a bearing set in place of bushings. These are very ridged in terms of handling but there's a catch. Depending on just how they are constructed they may require allot of maintenance and could be a reliability problem even then. The problem here is that the bearings may not be able to take the pounding of constant road use. Because there are a number of ways to build such a bearing it's hard to say just how reliable any given set is.
Removal/Installation Notes
These are general items that apply to most installations. Details for the control arms are in another article.
Bolts
Warning! Many suspension bolts nuts and washers are Metric Class 10.9 (Equivalent to SAE Grade 8) hardened materials. Do not substitute standard hardware for hardened stuff. You should not reuse hardened items that have been heated.
If the inner sleeve of the OE bushings is stuck to the bolt try to rotate the sleeve around until you see the seam in the sleeve. In Most cases you can tear the core sleeve loose with a large wrench. If needed, Cut the rubber so you can see inner sleeve. ((If you can't see the seam try feeling for it with a sharp object. Most of the OE bushings have the seam but it's often difficult to see it.))
Place a center punch on the sleeve right next to the seam and give it a good whack or three. This will indent the metal at the seam and split it open. The sleeve usually comes right off after this. Opening the seam will allow much more oil to loosen the bolt. Need more? Then hit the metal on other side of the seam so two dents hit each other.
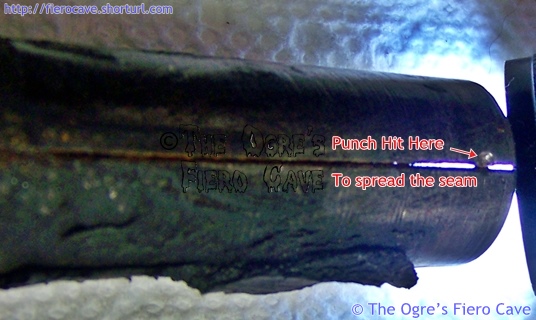
If there is no seam try a pin punch to shake the sleeve loose. Doing this to the sleeve usually works better than hitting the bolt.
When the punch idea doesn't work nor isn't an option, people frequently resort to heat. There is a trick to this as well. First cut away as much rubber/polyurethane as you can to expose the inner sleeve. Use a pencil tip propane torch to apply heat to the sleeve directly. Try to heat both ends of the sleeve whenever possible. You want to heat the sleeve so it expands and releases the bolt. (If you heat the bolt you make the thing tighter.) Make sure you have fire control! Be careful to protect the brake fuel and coolant lines from the heat source.
If the bushing bolts are damaged or heavily rusted the REPLACE THEM! Last thing you want is a weak anchor bolt breaking when you're out on the road. This could kill you depending on which one breaks.
When you install the center bolts always grease or antiseize the bolts to prevent them getting stuck inside the new bushing or sleeve. Warning: Grease or any lube at all on bolt threads then torque spec is invalid. Torque spec is for clean and dry threads.
OE rubber torsion
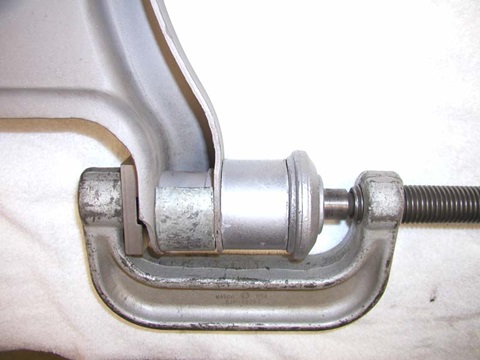
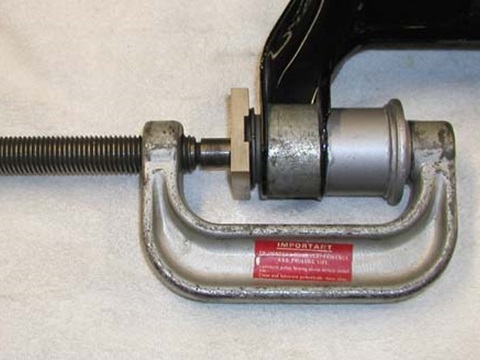
- Use scrap metal pipe to stuff CA so it doesn't collapse.
- Need a press.
Can make one with all thread rod, nuts, assorted big washers, and pipe
nipples.
Check AutoZone etc. loaner tools or find a shop.
You need to support both "ears" when press a bushing in or out. DIY and some Commercial presses need you to make stuffing parts.
Setup for Removing
Setup for Installing
Source (Both pictures): www.nsxprime.com/forum/showthread.php?p=1604104
Note: Moog and some others, any poly, and many OE rubber do not care about how you torque the center bolt because rubber is not bound to outer sleeve on CA bushings. Most CA bushings can't be damage by "winding up" the rubber. If your not sure then follow this tip.
When installing rubber bushings there is an important step that is often overlooked. Many people skip this step and the bushings are quickly ruined. This is one of the reasons many people think OE rubber bushings are junk.
The trick is knowing when to tighten the bolt through the middle of the bushing. If you tighten the bolt with the suspension hanging then the bushing ends up preloaded. The preload winds the rubber up really tight and first big bump can tear the bushing loose from the inner sleeve and ruin it.
What you want to do is run the nut on the center bolt up close but not tighten it. Then lower the car onto blocks so the suspension takes the full car weight. Now you tighten the center bolt. Doing this lets the bushing settle so it doesn't have a rotation load when the car is at rest. This seemingly small thing is absolutely essential to long bushing life.
This installation issue applies to Control Arm bushings, Leaf Spring end bushings, and any others used in a similar fashion.
Clarification...
Many rubber bushings, like Moog, are Not fused to both sleeves. This will allow them to shift in the hole to prevent serious preload and tearing when the hardware is tightened before the suspension is loaded. The problem is you can't tell when they are made this way. If you're not sure then load the suspension when you torque the bolts.
Still not sure? Contact MOOG web site.
Polyurethane
The #1 thing here is clean. Clean all the areas the bushing will rub against. (Don't worry about the outer shell much. The bushing won't rotate against it.) Dirty rough surfaces against the bushing ends or the inside diameter will make them squeak. For items like the sway bar supports clean at least a half an inch to either side of where the bushing rests. (Don't chew it up with coarse sandpaper and leave it rough either.)
Most of the polyurethane bushings require saving the outer shell of the OE rubber bushing. They come with a new center sleeve. The way I did my cradle bushings was to cut up as much of the OE bushing as I could with a drill and pull out the chunks with pliers. I only used heat to soften the rubber so I could scrape out the last bits. If you mark up the outer shell it's no big deal. It's more of a problem if you do something to swell the shell. Swelling the shell can leave it loose on the poly and that's no good. Make sure you put anti seize or grease on the center bolt to prevent it rusting into the new sleeve. The sleeves with poly are allot heavier than the OE one and won't be fun to get off if they rust solid.
You also have to grease all the places the bushings rub. This means the inside diameter and the ends of the bushing. You don't grease the outside diameter of the bushing or the outer shell. The bushing should not be rotating against the outer shell if it's installed correctly. You also want to grease or antiseize the bolts to prevent them getting stuck inside the sleeve.
What is the best grease? I don't know. Nobody seems to be able to agree on one. You can try the silicone grease used for brake work. That one won't wash off easily. (You only need to grease bushings that rotate like A arms not cradle or torque struts.) Teflon grease also gets allot of airtime in the forums. The makers of polyurethane bushings all recommend different things.
Another thing that might help is to make big washers out of something that won't corrode and put them between the ends of the bushings and the car frame. This will ensure a smooth surface for the bushings. Anything thin and preferably slick would work. Thin stainless and LDPE plastic come to mind. (LDPE is what take out soup container lids are made from.)
Solid Metal
You can only do these in the cradle. Depending on who made them you may, or may not, need to save the outer shell of the front cradle bushings like you do for polyurethane. The rear ones may use some or all the original metal parts. Once these are in you can just forget about them. Beyond an occasional check to make sure the bolts are tight there's nothing to do to them.
I've heard of people also using DuPont Delrin and other nylons for this as well. I don't know of any commercial products available in nylon. The commercially available ones I've seen are all aluminum. If you're interested in any kind of solid bushings ask around in the forums. There are a few people who've made them there.
These bushings won't squeak but you want to grease or antiseize the bolts to prevent them getting stuck inside the bushing.
Bearings
So far I've seen 2 kinds of bearings for the rear control arms. Needle bearings will need regular maintenance unless they are sealed somehow to keep out crud. The sleeve bearing I've seen uses a nylon insert for the bearing. These look like the least troublesome of the class. Depending on what the maker used for the nylon all you should have to do is keep an eye on them for wear and replace the nylon when it gets sloppy. The nylon should be able to better handle the abuse of street driving since it is slightly flexible.
Can't say much else about these. I believe there may be one retail source of needle bearing kits but I haven't seen any retail nylon bearing kits. We've seen one set of nylon bearings in the forums but nobody knows who made them. Not even the guy that has them knows from where they came, he got them with a car he bought.
Shell Games
Many polyurethane bushing sets require you to reuse the outer shell of the original bushing. I don't know that there's a "best way" to do this but here's how I do them. (This is a more detailed version of what I said above.)
WARNING! Use heat shielding as needed to protect nearby objects, fuel lines, and coolant lines. Keep Fire suppression equipment handy.
WARNING! Rubber holds a tremendous amount of heat and it sticks like glue. Do not touch hot rubber or allow pieces to fall on you! Wear eye protection!
Tools:
Large C clamp
Pipe cap that fits over the small end of the bushing shell. You'll use this with the clamp so you can press the new bushing straight. (Makes pressing much quicker.)
Pencil Tip Propane torch
Fine serrated knife
Coarse hack saw blades, 12-16 teeth per inch
Hacksaw frame, preferably one that will let you mount the blade sideways, etc. Being able to mount the blade sideways helps with bushings that have restricted access like the front of the cradle.
Large pliers and/or vise gripes.
Getting to Work
This can, and likely will, get messy. Put something under your work to catch melted rubber bits that may fall. That stuff will often want to stick to anything it hits. A scrap of plywood or heavy corrugated cardboard works well.
Once the mounting bolt is removed and you have access to the bushing...
- Heat the core sleeve until you can pull it out with pliers. Direct the heat thru the core. Try twisting the sleeve every so often to see when the thing is coming loose. (In most cases it should come out before the metal is red-hot.)
- Cool down the rubber with some water.
- Once you remove the inner metal sleeve... try working a screw driver between the rubber and outer shell. Not all bushings, especially in control arms, are bonded to the outer shell. You can often pry the rubber out with little effort once the inner metal is removed.
- If you can't pry out the rubber... It's cutting time. The hacksaw is handy here. Be careful if using knives! This application can snap the blades or handles. Cut it up and use pliers to help pull off big chunks. (Note! The hacksaw or knife blade can get amazingly hot when cutting rubber. Don't touch it.)
- Use a bit of heat on the rubber to aid scraping the last bits from the shell. You do not need to worry about scratching up the shell. The bushing doesn't rotate against the outer shell. (If it does, something major is wrong.)
- Start the bushing into the shell by hand. (Leave the core sleeve out for now)
- Cover the small end of the shell with the pipe cap and use the C clamp to press the bushing in.
- Lube the inside of the bushing using your favorite method. (You do not need to grease front cradle bushings at all. They don't rotate and thus can't squeak.)
- Insert the core sleeve.
- Grease the inside of the sleeve and the mounting bolt before you install it. This is to prevent rust. If the bolt seizes inside the sleeves used with polyurethane you may never get it out. (The new sleeves are usually much thicker and are cut from tubing instead of rolled. You won't have a seam in them.)
For bushings you can remove from the car, like control arms, instead of steps 4 and 5 you may be able to get the rubber out by driving an old flat bladed screwdriver between the rubber and shell. Keep the bushing supported and work your way around the shell. (This depends allot on how bad the bushing is.) NOTE! If you try this with an old wood chisel, DO NOT PRY with it! The chisel can break very easily like that. Oil the shaft of the tool to make it easier to extract from the bushing.
At step 6, some people say you should grease the outside of the bushing. Maybe a little just to stop rusting. The bushing should be tight in the shell, never rotate in it.
The inner sleeve in most cases will need lubrication. There are notes on lubrication in the control arm article since that mainly applies to them. Cradle bushings are a typical exception to this. They move so little they shouldn't ever squawk. (I installed my cradle set totally dry.)