Go Home
Site Map
Dash Lamps & Dimmer
Many people have commented that the dash is too dim. The six 194 lamps, when they work right, are usually quite bright. Dim dash lighting normally indicates there is a problem in the dash or the dash dimmer. (There's already 18 watts of light just in the gauge cluster!)
Using Brighter bulbs or LED in the dash and driving at night can cause problems to see the road. Call Light Pollution and is a real problem. Very easy and common issue outside of city. You want dash to dim as possible to see outside at night.
If you have dim dash lights, one or more of the following may be wrong:
- Old Lamps. They can go dim or get "soot build up" as they age. Many owners dim the bulbs so bulbs can last a long time. (Soot looks black to silver on inside of glass.)
- Dash lamp sockets corroded loose or broken. Check the contact that touches on the dash copper.
- Dash electrical connectors loose or corroded.
- The transistor is getting poor contact with the socket. Fix or replace the transistor module.
- The dimmer wheel is making poor contact or worn out inside. Fix or replace the dimmer wheel.
- Interior of dash is shabby. You may have to tear apart the dash and clean or repaint the inside. Dirty or faded surfaces in there will absorb light instead of reflect it to the gauges.
If you feel that the dash lamps are too dim even when the control is turned all the way up, check/replace the lamps and check the dimmer circuit! It takes very little corrosion to keep the transistor from giving the lamps full power. (Up to 13 lamps are connected to the transistor. There are 6 in the gauge cluster alone.) Any added resistance in the connectors or transistor socket will keep the lamps dim.
Brighter lamps may compensate for a dimmer problem but they will eventually go dark as the dimmer gets worse. Brighter lamps will also make the trasistor run hotter. As I remember, the stock lamps are 3 watts and the ones some people are using are 5 watts. That would increase the total lamp load by 12 watts just in the gauge cluster. This could cause long term problems for the dimmer and the cluster.
I strongly urge you to check for system defects before installing brighter lamps. The increased heat could accelerate degrading of the plastics in the dash and the increased electrical load could cause problems with the transistor. (It could also cause heating of things near the transistor.)
LEDs are better than 194 bulbs.
Not really.
- While LED can save power, a few small bulbs doesn't use much power. Some LED units can use as much or more than a 194 lamp. 194 bulb uses 0.27 amp max each. Many owners dim the bulbs so bulbs uses less power.
- Most LEDs do not dim well with Fiero's dimmer circuitry. I've tried LED and went back to normal 194. The problem is LEDs have much less range of dimming with OE dimmer circuit.
- Car voltage and current are not very stable. Worse, Cars sees power surges from turning on/off various motors and relays. Often Bulbs are more resistance to power surges. Many LED products does not use surge protection.
- Many have problem because of quality of products etc. As a result Many products won't last long from the start.
If you can vary the brightness with the dimmer wheel, your dimmer circuit is almost certainly OK.
I get this allot, you think so but you're wrong... The problem is that the dimmer or transistor socket can add resistance because of cruddy connections. This can keep you from getting full power to the lamps even tho the dimmer appears to work. Reseating the plugs, and often the transistor itself, usually takes care of it unless the dimmer control or transistor are starting to fail.
To test... Eliminate dimmer circuit
Pull transistor socket.
Jumper C, Dk Green wire, and D, Brown wire, on the socket.
It will give full power to bulbs. OE bulbs are brighter then Dimmer has a problem. If they are still dim then dash has problem(s).
But note... Is easy to have multiple problem with dash illumination... iffy dimmer + dying bulbs + etc = really dim bulbs. You buy brighter bulbs? Then you likely still have other problem that will get worse.
What is the dimmer?
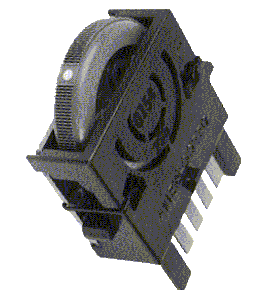 The dash lamp dimmer consists of 2 main parts, the control
wheel on the dash and a transistor. The control wheel combines a switch for
the courtesy lights and a variable resistor for the dash lights.
The transistor is mounted in a heat sink on
the dash framework to the right of the steering column.
The control wheel and transistor both get power from the headlight switch. (Brown wires) The output from the wheel goes to the transistor via a green and white wire. The lamp feed from the transistor is a dark green wire.
To protect the transistor, there is a 5 amp fuse between it and the dash lamps it controls. (It's in the fuse block like all the others.)
Problems/Issues
First, Replace the bulbs and sockets for dash illumination. You can buy separate bulb and socket or use PC194 (194PC) that contain the bulb and socket. (You need 4 bulbs and sockets for dash illumination and 1 for rally gage illumination. See Service Manual, 87-88 years, page 8A-80-5 for a list where dash bulbs goes.)
The main problem with the transistor assembly is corrosion on the pins of the transistor. Corrosion builds up on the pins and interferes with the socket contacts. It take very little corrosion to leave the dash lamps dim or dead.
A simple reseating of the socket will often cure this. The white goop that some people have been removing from between the transistor and heat sink IS SUPPOSED TO BE THERE! It is called heat sink compound. Removing this compound and not replacing it makes the transistor run hotter. Excess heat sink compound on the pins is annoying to clean up but does not cause problems with the socket or electrical connections.
The other problem is that you could have a dead transistor, or if you are adding more than one or two lamps to the dimmer controlled set you may need a bigger transistor.
The Transistor is a high current NPN type in a TO-3 case. It is a standard part and can be replaced by a number of different types on the market. The new transistor must be able to handle no less than 7 amps. The More current the transistor can handle the better. You want the transistor to be stronger than the fuse between it and the lamps. Also, if the transistor is bigger then it will run cooler. (I've seen compatible transistors with capacities of 20 amps.)
If you are adding lamps to be dimmed you need to keep in mind your top amp limit for this circuit must be below what the headlight switch can provide. The transistor capacity needs to be at least 2-3 amps larger than the fuse in the dash lamp circuit. (If you only add one or two small lamps the dimmer should be fine. You only need to worry if you add a bunch of lamps.)
Cleaning/Repairing
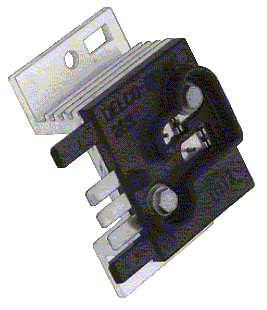 Unplug the harness and remove the heat sink from the dash.
Remove the transistor from the heat sink. Be careful to avoid damaging the pins.
Clean the old heat sink compound off the parts with alcohol being careful to avoid breaking the plastic insulator between the transistor and heat sink. (The heat sink compound ages and dries out. When it does it impairs cooling of the transistor. )
Get a small tube of heat sink compound and if need be a new insulator at an electronics supplier. Radio Shack has both items.
Put a small gob of compound on each side of the insulator and remount the transistor. Just let the stuff spread by itself as you tighten the transistor. Wipe up whatever oozes out.
If the socket does not make good contact on the pins you can try "tinning" them. Carefully heat the pins with a soldering iron and apply a coat of solder to them. This will make the pins thicker and should improve contact. Do Not overheat the pins or you'll damage the transistor. Heat the pins only long enough to get them to take solder.
2nd option... Solder the pin in the socket, like this. Warnings same as above.
Once the transistor assembly is back together a little dielectric grease on the pins can help prevent future corrosion.
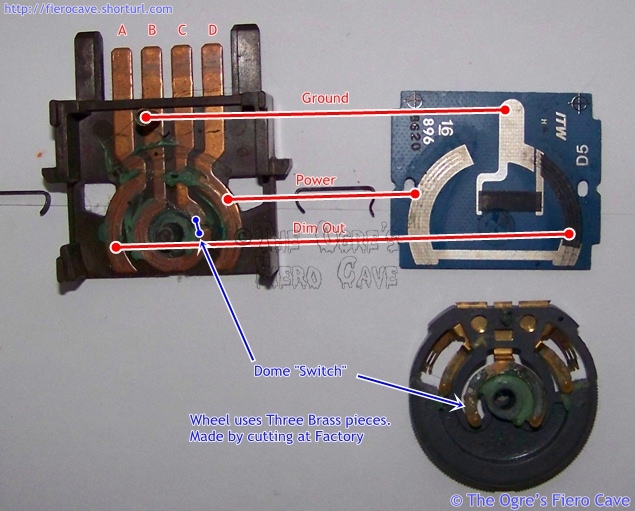
The dimmer wheel can also be taken apart and cleaned. Save a dab of its grease for reassembly. If the grease is really crappy, try dielectric grease.
Bad Transistor?
Try this and use new heat sink compound!
Note: Yes, the 2N3055 can take more amps But I don't know if the heatsink can take more heat. Remember... More amps = more heat. Too much Heat and you burn up the transistor, or worse cause a fire. Add 1 to 5 194 light bulbs are probably ok. Factory load is about 2 amps for all bulbs that dimmer controls. "Inst" Fuse is 5 amp and OE transistor can handle 7 amp.
Don't want to be bothered?
As far as I can tell, GM still has these parts available to dealers. I've seen both the dimmer wheel and the transistor listed in aftermarket parts. Try Autozone, etc.
They are also very easy to find used. This transistor assembly is in use on a large number of GM cars. Because of the way GM does headlight controls, you can find one under the dash in nearly any GM product made in the last 20+ years. Practically any GM car with a separate slider knob or wheel to dim the dash lights should have one of these in it. The only difference is that some of them are held to the dash by screws and others by 10mm self-threading bolts. How they are mounted doesn't matter as long as it physically looks like the Fiero one it should work.
Sylvania offers a 194 lamp with its own socket for the dash. No more digging thru used ones to find a good socket.
| Part | Number | Who |
|---|---|---|
| IP Dimmer Wheel | D1546A | AC Delco |
| IP Dimmer Transistor | D1509B | AC Delco |
| 194 Lamp w/ Socket | 194PC | Sylvania |
Dimmer Schematic
Updated 06/03/13
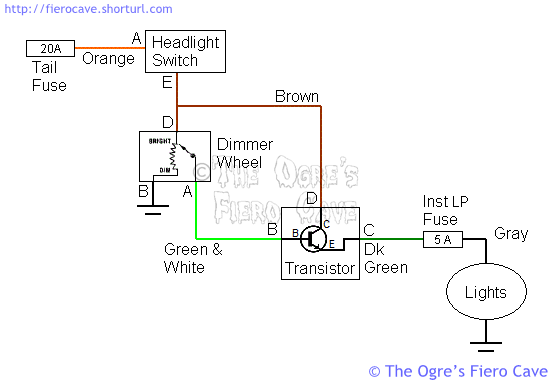
This schematic is more accurate based on the dimmer I took apart to make this picture below. It shows the B terminal, the dimmer ground, is routed to the dimmer resistors making a voltage divider. (Google: voltage divider) The black areas are printed resistors and a spring makes contact with the circuit board for the ground.