 Go Home
Site Map
Adorable Doors
WARNING: Doors are Heavy! You will need helper(s) to remove/install doors or rebuild the hinges. If you must work by yourself you can use a floor jack with wood or other padding on top to support the door. Don't use a "bottle" jack. They are too easy to knock over.
Here's a guide on how to work on each area of the Fiero's unique door assembly. The MotorMite products below should come in handy and will save you fooling with a GM dealer.
| Products that work on Fiero doors | |
|---|---|
| Interior Panel "Christmas Tree" fastener, 3 per pak | Body-Tite! # 45815 |
| Window Crank clips, A bunch in a pak. | HELP! # 76980 |
| Hinge pin w/ bushings (2 kits per door) | HELP! # 38407 |
| Hinge Bushings Only | HELP! |
| 2 pak of "screw rivets" for bottom of exterior skin | Rivet-Tite! # 47954 |
| Ext drivers door handle | HELP! |
| Ext passenger door handle | HELP! |
Detent Roller 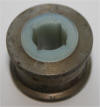
|
GM # 20058035 |
Detent Roller Pin 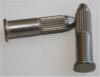
|
GM # 20262500 |
Most are Dorman parts. Thanks to Dodgerunner for Detent parts.
Hinge Service.
WARNING: The spring in the bottom door hinge is under heavy load at all times. Use extreme caution working in the hinges.
Notes:
To remove/adjust the door side of the hinges without removing the outer skin, you need to remove the bolts from the front window track and drop the track into the bottom of the door. (Two bolts hold the track and the window must be up.) You'll also need a ratchet handle, long extension, and a flex joint to go with the correct socket.
If the pins and locking clips are ok, you can replace just the bushings. You have to remove the locking clip from the pin carefully but it is reusable. (Gently spread the seam of the clip until it will slide along the pin.)
Many aftermarket pins are too long to use in the upper hinge. (Pin can fit but interfere with the skin "bolt.") If passenger side pins are good... Use passenger side lower pin in driver side upper hinge.
Let's face it sooner or later you will need new hinge pins for your doors. The problem with the OEM bushings is they don't provide much bearing surface between the hinge sections. The bushings are made for rotational loading not the heavy axial load they get as well. (Axial load is the vertical load along the pin centers.) This problem results in the hinge wearing a depression where the bearing flange rubs and/or the flange crumbles. This allows the 2 halves of the hinge to rub and bind. Even new brass will quickly wear off the flanges on the top bushings. To eliminate the problem permanently there is a small change you can make to the bottom hinge that will make the door work like new for many years.
After you replace the bushings insert a nylon washer into the bottom hinge as shown in the drawing below before inserting the pin. The washer will take the weight off the flanges of the top bushings in both hinges and increase bearing surface tremendously. The washer will put the hinge in proper alignment and keep it there for years.
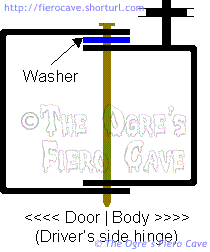
The nylon or copper washers used for sealing the oil drain plugs are perfect for this use. They fit like they were made for it. You can get them at most parts stores. I prefer nylon myself. It's more slick and gives some spring than copper.
Lube the bushings and washer with brake grease or some other grease that won't easily wash out.
You may have to adjust the bottom hinge just a smidgen depending on the thickness of the washer you use. The adjustment is inside the door. (The post side is not adjustable.) In most cases no adjustment should be needed.
Why not put washers in the top and bottom hinges? There is not enough metal in the top to do this. It's not needed anyway. With this change the bottom hinge will take all the axial loads and is more than strong enough to do so. Leave the top hinge so the 2 halves are not rubbing at all.
Washer data update
I don't have part number I used... I wrote this 10+ years ago. Any that clear the brass bushing, and 1.7-2mm thick is ok.
Search Dorman, oil drain plug gasket (Note that Dorman's catalog can show same part with different numbers because of packaging.) I'll try to find one that fits better.
I tried 65270, a bit small and doesn't clear the bushing. Its lasted 10+ years. The nylon does squeeze a little bit when it gets pinched between the bushing and hinge body.
Hinge Detent Roller
Using GM part, it Can be done in car and doors attach.
Once the detent spring is off...
Lock Vise-grip on the roller and hit bottom of Vise-grip with hammer close to roller. (Update soon, I hope.)
Hinge Spring Tool
Here's a note from Carrolles that was posted in the thread "Popping off the doors?? Help a brother out!!" This tool is worth having even if you only use it one time. You may also be able to borrow one from some parts stores. Many of the chain stores have loaner tools.
I got the Steck GM Door Hinge Spring Tool from Tools USA (800) 451-2425 look under hand/specialty tools.
Part number (they call it ID number) 4520
Harbor Freight and others carry the Tool.
The interior door skin
Removal of the interior skin is simplified by purchasing 2 tools, a panel lifter and a window crank tool if you have manual windows.
The armrest is held by three #3 Phillips screws. One is under the decorative plug at the top of the handle section.
A hidden clip holds the window crank. Line the tool up with the crank knob and slide between the handle and wear guard disk to push out the clip. The slot in the handle can be tight. Wiggle the tool until it drops in the slot. Note: If the handle was previously removed the clip may be on backward. (To reinstall the handle put the clip in the slot with the open side toward the knob then just push it onto the shaft.)
The door handle trim is held by two #2 Phillips screws. One is under the logo and the other is under a tin cap. Once the screws are out carefully remove the lock button from the lock rod. The lock button pulls of toward you and it's held rather tight. Rotate the trim plate as you lift it around the handle.
1 set screw on the window side of the trim holds the driver's side mirror control in it's place.
Work your way around the panel with the panel lifter and carefully pry out the clips. Avoid damaging the panel. Clips are fairly easy to replace but panel damage can be hard to fix.
Note! There is usually a fastener on the rear bottom corner of the door panel that is cut short. This is done so that the window will not hit it. If you replace this fastener and don't trim it by about 1/3 then it will snag the window near the bottom of its travel.
Mirror
Two 10mm nuts hold the mirror. The nuts are accessed by removing the rubber filler in front of the window opening. There are three #2 Phillips screws holding the filler, one of them is normally hidden under the inner skin.
Power Mirrors
There is an electrical connection inside the door. Carefully fish it out of the hole and disconnect it.
Inner Dew seal
Four #2 Phillips screws and a metal strip hold inner Dew Seal. It rests on top of the door edge.
Outer Dew seal
The outer Dew Seal is held by the mirror nuts and some #2 Phillips screws. To gain clearance for access to the screws, remove the inner seal and release the inner pressure guides on the top of the door. There are 2 guides held by a single stud in each. Rodney Dickman sells a tool to make removing these screws easier. You can make one fairly easy by epoxying a #2 Phillips screw bit to any length of stiff metal. Just be careful not to scratch the glass. (Rodney's tool is coated to help prevent scratching.)
The exterior door skin
Removal of the exterior skin requires removal of the interior skin and the mirror. The door skins are attached by the following hardware:
- 2 7mm hex head sheet metal screws (hidden under exterior trim)
- 7 T30 Torx head machine screws
- 4 plastic rivets
- 1 rod clip on the door handle
- 1 "christmas tree" fastener
The removing the door skins requires removing the interior trim and panel. This in itself is annoying. You will want to take the clip off the window handle. You may need to run the window up and down at times while you work. (Always roll down the window when the door is off the car!)
The trim across the middle of the skin releases by carefully prying out the Christmas tree under the outside door handle. The rest of the clips are released from behind the skin. The front most clip must be carefully pulled out of the trim as it's screwed down. (You do not have to remove the small piece of trim aft of the handle.)
Leave the door handle and lock rod alone until the skin is loose. The door handle link will slide out of the latch as you lift the skin off. There is only one place in the latch where the link will fit to reassemble the skin. Dropping the rod into the latch is a little tricky but is much easier than messing with the handle clip from inside the door. You also don't get cut up this way.
The lock linkage is very easy to get off and on with the panel loose. (Handle the panel carefully until you free the lock clip.) To remove the lock linkage, carefully pry up the top of the clip and push it down the arm away from the lock. To install the lock linkage, put the clip on the lock arm first then press the linkage into the arm until it clicks into place.
Remove the mirror.
Remove the 2 hex head sheet metal screws that are under the trim. (7mm heads)
Carefully break or drill out the 4 plastic pop rivets on the bottom of the door. Be careful not to crack the skin.
Remove the T30 Torx screws from the front and back edges of the skin. Make sure you place the bit fully into the screws and hold it straight or you will strip out the screws.
Pull the panel out at the bottom. Lift the panel off the hooks at the top. Be careful not to break the tabs on top of the skin.
When you reassemble the door you have to come up with something to replace the broken rivets, and hold the trim if you broke the clips.
Blobs of silicon inside the door can hold the trim on what is left of the clips. Usually the ear beaks out of the clip leaving a nice loop. Some little wood or plastic wedges in the loops will hold the thing tight while the silicon sets.
The door rivets can be replaced with either christmas trees, or plastic screw rivets. Suitable screw rivets are Rivet-Tite #47954. These are 1/4-inch diameter and fit like they where original. They are also reentrant should you need to do this again. You need 2 packages per door and the total cost per door is about $3. (christmas trees are also reentrant, but repeated prying risks cracking the door skin.) I don't recommend use of metallic fasteners.
Skin Adjustment
(Calling the dermatologist...)
The exterior skin on Fiero doors is adjustable but, like practically everything else on the car, there is a trick to it.
A bit of background
When Fiero was assembled, Pontiac needed a way to allow the door skin to be adjusted to clear the fender etc. The problem is that the skin had to be locked in place after adjustment. This was accomplished with a single screw in the door skin.
Inside the door by the exterior lock, there is an adjustable plastic slug. Once the skin position was adjusted, Pontiac drove a screw into this slug to lock the location. This single screw is one of the major factors that has confused many people into thinking the doors are custom to each car.
Adjustment
Note: Adjusting the door skin may expose areas scuffed by the mirror gasket. You may or may not be able to cover this by adjusting the mirror.
Warning: Use "Pop" rivet on bottom? Leave them out until you are done. Already there? Maybe need do remove them. Factory and some others doesn't matter.
- Loosen the screws along the front and back of the door skin. You don't have to worry about the mirror or bottom rivets. The mirror isn't attached to the skin and the rivets are in slots.
- Close Door
- Remove the molding between the door handle and front of the door.
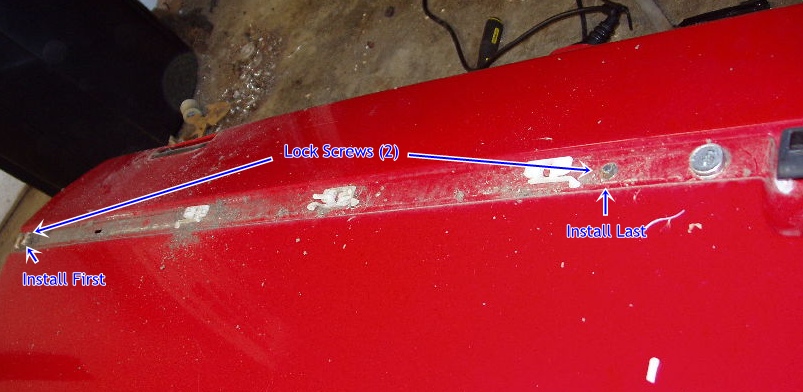
- There are 2 screws under the molding. Loosen the front one. Remove the one by the door handle. The skin is now free for adjustment. There's about 1/4 to 3/8 inch of play front to back.
- Tighten the front screw in first and Check Alignment.
- Once the new position is determined, lock the skin by driving in the screw
by the door handle.
If you can see hole in door, tighten it down.
If you can't see hole in door, use power driver and use screw as a drill. (OE screw is ok. Lost screw? Drill then use regular sheet metal screw.) - Tighten all the other fasteners, replace the molding and you're finished.
Source: How To Completely Disassemble Your Doors and note by The Orge.