 Go Home
Site Map
Stop That!
The Fiero Brake System
There has been a huge amount of stuff in the forum concerning Fiero brakes. This article will explore the existing OE brakes and "upgrade" issues in more detail than most consumer or shop service books. I'll try to keep this a plane English as I can. (This is a very long document. Many people may find it easier to print it rather than read online.)
Warning! This document may not contain all the data you need to alter OE systems. The Reader assumes ALL Risk and Liability of installing, testing, and operating cars modified using this information. The Ogre does not endorse any method of brake system modification!
NOTE! The Fiero Store sells a "big bore" master cylinder (Blazer MC). Increasing the MC bore diameter REDUCES fluid pressure. It will always make the brakes weaker not stronger! When installed on an otherwise stock Fiero it will seriously reduce brake system performance. You DO NOT want this thing on a stock Fiero! (See alt MC below.)
Note that this article is written for the 84-87 Fiero. The data can be altered to work for the 88 Fiero or any other car you are planing to convert.
Drawings presented in this article ARE NOT TO SCALE!
Erratum
This page and my PPF posts were basic on the "fact" that Rear Caliper using a 45mm piston. This data was from an old source from 2001 and back then Wagner and Raybestos catalogs were unavailable online. The correct Rear Piston is 48mm diameter and will affect the Excel sheet I use and linked below. That Excel sheet was fixed 2/17/11. Thank to PerKr in forum for error note.
Switch 45 -> 48mm does matter some and means the Bias calculation is bit off. It means:
- Bias isn't main problem using 4 wheel GA upgrade. Switch Rear OE piston diameter makes Bias issue even less so. But!
- Using GA and any other Front caliper in back is Illegal in U.S. and other countries and for this fact alone I'll never recommend it to anyone for street use.
- Bias issue aside, using GA in front still has mechanical problem coved below and in PFF.
- Using GA Front, Seville Rear, and Blazer MC, will be Bias to front more than I figured but not enough to negate the upgrade as an option. If you are going to use any upgrade path then this option is better to be street legal.
- And no, you can't use GA or Seville calipers on rear and using OE front. This will cause rear bias and is not safe. Adding prop valve just hides the problem when the work.
Why did you write all this?
I was originally looking at the "Grand Am" brake upgrade for my own car but the more I looked into it the more questions I had. I found a number of major safety concerns that were not addressed. I also found a number of legal issues that no one even mentioned.
While digging for data I found many people installing the GA upgrade that had no idea what kind of problems they might be getting into. I also saw more than a few comments from people who are not happy with the results.
When I started digging into the operation of the OE system, and comparing it to the "upgrade", I was amazed at the number of mechanical and hydraulic issues that no one had taken into account.
This started by doing the math on the hydraulics, which exposed some very scary problems. When you add in the machining problems to make the front end except the GA parts, the project becomes much more complicated than any of the articles I've found on the net are telling us. No one should be doing the upgrade based on the scant published instructions. You are risking your life and others if you do.
The information here applies to all brake systems. It will help you uncover potential problems before you replace any parts. Keep in mind the math only provides a starting point, because we don't have all the data for various brake pads, you won't know the final result until system is assembled. Generally, if the hydraulic or mechanical math shows a problem, it's not going to get better after you install parts.
For comparison
When talking about brake upgrades, we need something to compare to otherwise we have a no starting point. So we need a trusted source.
Fiero Brake Spec was: (stopping distance from 60 MPH per 87 owner's manual)
- 192' stopping distance with max load. (Max load 401 lb. per label on car. GVWR 3124 lb. 87 Fiero Sport)
- 187' stopping distance with light load (light means driver weighing approximate 150 pounds)
- 334' stopping distance using emergency service brake with partially service break system failure (see note)
- 302' stopping distance with brake power unit failure (brake booster failure)
Note: FMVSS says Parking brake not an Emergency brake. See the rear brake article.
In 1984, the Fiero was rated for a maximum load 187' and for light load 183' for stopping per the owner's manual.
The difference in it the specs? The 87 specs allows the V6 engine with automatic transmission. The manual transmission with any engine will stop shorter than spec. (Push brakes, push the clutch...) To keep it simple to published the owner's manual, the specs cover only one case, the heaviest and most powerful engine option available with automatic transmission.
Note that with better brake pads, shock, struts and/or tires the car will stop better than spec.
Now how much the Grand Am or any other upgrade will shorten the stopping distance is anyone's guess. Why? There are too many upgrades and not enough qualified testing. When someone says their upgrades stops better, are they comparing to the specs above, a worn out Fiero brake system, or what? Example: Doing a simple test like stopping, the brake pads were hot or cold? Brake pad temperature affects braking performance considerably. Even if they did test before and after the upgrade, was the car had bad OE brakes? Then the test doesn't mean anything. Many owners can't tell if the Fiero brake system parts, especially rear calipers, are good, bad, etc.
If Grand Am/Seville brakes don't do anything to shorten your stopping distance, or shorten by a few feet, than why upgrade and do all that work? The vented rotors will resist fade so racers and maybe folks living in the hill country will like it.
Are we going to cover the brake booster or the pedal hardware?
While important, these parts are not easily altered. They either work or they don't and when they don't you simply replace the offending part. I don't think you can get a larger booster in the available space if there even is one that has the right mounting.
Altering the pedal is way beyond the skill of most people. (Most people that do have the skill won't do it...) Here's some stuff about the pedal if you need it. It includes the measured pedal ratio.
For Larger Booster
Warning: 84-86 Fiero uses a booster filter in the engine bay. Check the filter and vac line for promblems Before you plan a booster upgrade.
See $100 brake upgrade and Rodney Dickman's comments.
I don't like Booster upgrade but don't hate it. Many are comparing old booster with problems to new bigger booster, an apple/orange comparison. Worse, Some are comparing Fiero to other cars/trucks. Many cars have different boosters on different engines and Many of them have different brake design and need whatever booster. This is why Part Stores ask engine type when you only want brake parts. Comparing to other cars is often dangerous.
Note that a booster can "die" without vacuum leaks. One diaphragm can fail and reduce brake performance. (Use Google: vacuum booster failure) Fiero is 25+ years old and OE booster can have problem in old age. Many can try to replace with a used booster but is possible that used one is bad too. Cars with vacuum filter in engine (84-86 L4) can loose brake performance when the filter is dieing.
A bigger booster will Increase line pressure but no-one does homework to see want this means... Charts in $100 upgrade are for 88 but 84-87 will see similar results.
Booster "Upgrades" often hides Vacuum problems
Let's ignore "normal" external vacuum leaks in the line or the booster itself... Just changing the booster or using the bigger booster upgrade could still hind problems.
Changing a booster often means changing the check valve. Many replace the booster when they just need to spend a few dollars and replace the valve. The valve is a well-known source of booster problems and can wear out normally. A bad/dirty valve can cause the booster to loose vacuum when you hit the gas pedal and booster does take time to get full vacuum after you release the gas pedal. Many people forget that Engine Manifold Vacuum is not a Constant and varies widely between Zero and 25 inches Hg depending on throttle angle. (Cruise control etc have an external tank and check valve for same reason.)
Another Problem is that 84-86 use 3/8in and 87-88 use 1/2in vacuum hoses pipes and fittings. Worse, 22P etc didn't cover this change and have wrong parts listed for 87-88, like booster's Check valve. If you have problems fitting the hose to new booster this is why. Suggested you order the correct valve and don't reuse iffy old valves. (The correct numbers are covered in Brake Service page.)
GM didn't make this change without a very good reason, So Why? Because Diameter, Length and Bends will affect total volume moved in X amount of time. Bending adds more turbulence and resists flow.
- FWD and other cars have 3 Feet or often less of vacuum line to the booster.
- Fiero uses around 9 Feet of line. About Three or more times what most cars have.
- Fiero lines have several tight radius 90° bends.
These are part of why people have more problems in autocross because booster can't keep up with brake demand, especially on the small vacuum line. Bigger Booster can "solve" this issue by hiding small size of vacuum line but can have problem too just not as obvious problem to many.
Can it cause line blowout in panic stop settings?
Maybe. Bigger Booster adds input pressure to the MC then MC make more Line
Pressure. Problem is Fiero brake lines (hard and soft) are 25-30 years old.
At minimum, Get new rubber hose but newer SAE j1401 type hose.
Often sold as "Pro Grade" hose assembles, like Raybestos PG Plus. Preforms better OE w/o problems for SS.
See rubber brake lines vs stainless steel
Will it made brake's Perform better?
Likely on dry pavement but Driving in Rain or on snow/ice, dirt, etc. can be worse. Over boosting is a problem to many. Over boost can made brakes touchy and are very hard modulate that can cause spinout or worse when driving in slippery conditions.
You might see big booster is good or whatever but depends on many things...
Transmission is one big one.
Auto transmission will put engine load on car when stopping. At idled V6 or V8
push more load thru auto trans then iron duke.
Manuals then you push the clutch and no engine load goes to wheel while
stopping.
Why isn't the mechanical math here?
Because there isn't any point. The Grand Am parts are essentially identical to OE Fiero in terms of pad size and rotor diameter. People install Grand Am parts to gain bigger caliper pistons and vented rotors. The only time the mechanical math is relevant is when you change the diameter of the rotor and things like that.
Ketchup
Just to get everyone on the same page, lets start with a block diagram of the OE brake system.
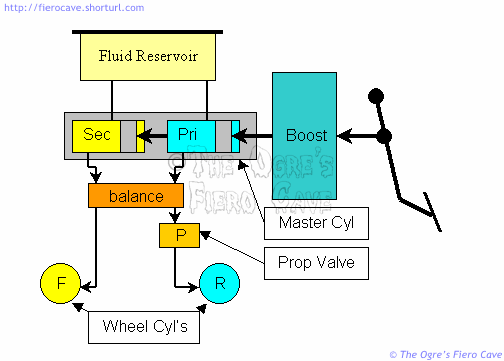
If we look at the flow of pressure from the Driver's foot to the wheel we end up with:
- The vacuum operated boost unit assists the driver in generating mechanical pressure on the master cylinder pistons.
- The pedal mechanical force enters a dual circuit Step Bore Master Cylinder, also called a "Quick Take-up" Master Cylinder, to provide hydraulic pressure. The Fluid reserve is attached to the top of the Master Cylinder.
- The balance is used to detect failure in a brake circuit. Should one circuit have low pressure, the balance will move and activate a warning lamp on the dash.
- The Proportioning Valve is built into the balance block. This valve regulates flow rate and pressure to the rear calipers. Its job is to prevent rear brake lockup that could spin the car.
- The calipers clamp the pads on the rotor to stop the car.
What the ____ is a Quick Take-up Master Cylinder?
Here's how the MC and it's Quick Take-up valve works.
How is hydraulic pressure and displacement determined? (Basic Hydraulics)
This is where stuff gets complicated fast. Everything is based on the area of a circle and the volume of a cylinder. Hydraulic calculations are done using the area of the piston face not diameter. Here are some "laws" of science we need to keep in mind:
- Math, Area of a Circle = Pi x Radius2
- Math, Volume of a cylinder = Area of the circle x height of the cylinder
- Physics, For every Action there is an Equal and Opposite Reaction.
- Hydraulics, Pressure of the Hydraulic Fluid is Always Equal over the Entire System.
- Hydraulics, Output Force Increases by the ratio between the pistons while Output Motion Decreases by the same ratio.
It's easier to show you an example. To keep things easy we'll assume the ratio of input to output is 10:1.
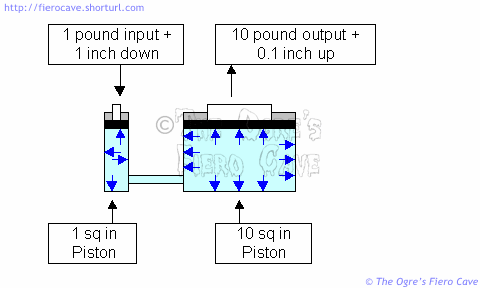
As the small piston moves down it generates 1 PSI in all direction in the blue fluid. When it has moved down 1 inch it will displace 1 cubic inch of fluid. Since the large piston has 10 times the area of the small piston, it delivers 10 pounds of force but because it needs 10 times the volume to move it only moves one 10th the distance of the small piston. If we move to 100:1 ratio then the large piston delivers 100 pounds of force but only moves 0.01 inches up. (To move the 10 sq in piston up one inch, we need 10 inches of travel in the small cylinder.)
If I put a second piston in my basic example, the Fluid Volume is split between the 2 pistons, but the Fluid Pressure is always equal over the whole system. Both pistons would push up 10 pounds but for every inch of input travel they would move up 0.05 instead of 0.10. System Pressure is still 1PSI. To get both pistons up 0.10 I now have to move the input 2 inches because I doubled the moving output area of the system to a total of 20 square inches. (Total ratio with 2 10 sqin pistons is 20:1.)
Now, I want all of you to completely forget about the PSI pressure of the fluid. It doesn't matter at all for the rest of this article. From now on, we only care about the following items:
- The ratio between the input (MC) piston and the output (caliper) piston.
- The linear force applied to or generated by a piston.
- Clamp force in the caliper is 2 times the linear force of the piston. (I'll explain why in a sec...)
- The volume of fluid movement generated by or used by a piston.
Think of the hydraulics as a liquid lever. If you have a beam that is 11 feet long and put a pivot one foot from the end, you have a 10:1 lever. If you pull down on the long arm with 1 pound the short end can lift 10 but it doesn't go very far. The brake pedal just adds another lever in series. If we use a 4:1 pedal: you put 1 pound into the pedal and the pedal puts 4 pounds on the 10:1 lever. That means on the short end of the second lever we now are lifting 40 pounds but we are getting even less distance.
The clamping force at the caliper is doubled because Physics tells us that for every force there is an equal but opposite force. At the input, the 100 pound force of your foot is pushing your butt into the seat with an equal 100 pounds. At the caliper the shell wraps back around in front of the piston and creates an equal strength canceling force. The total pressure where they meet is twice what ever the piston is making. (The same rules work for multiple pistons in a caliper. Just the calculation process changes slightly.)
For those of you that just have to know what the working PSI of the fluid is, divide the input force by the piston area in square inches. The area is about .785sq in for the 25.4mm MC.
Input / .785 = Fluid PSI (Aproximate.)
So if you have 400 pounds of input then fluid pressure is about 510PSI.
How does this work in Fiero?
The brake system is physically different but the rules are the same. If you put bigger caliper pistons at the wheels, you get more pressure but the volume needed to move them also increases. If the increase is more than the MC can deliver, you have a major problem. This is why you start running into problems when using the Grand AM calipers.
| Setup | MC diam | MC area | Cal diam | Cal area | Piston Ratio |
|---|---|---|---|---|---|
| Front | mm | sqmm | mm | sqmm | X:1 |
| Fiero stock | 25.4 | 506.707 | 49 | 1885.741 | 3.722 |
| Fiero MC & GA caliper | 25.4 | 506.707 | 57 | 2551.759 | 5.036 |
| Blazer MC & GA caliper | 28.6 | 642.424 | 57 | 2551.759 | 3.972 |
| Rear | mm | Sqmm | mm | sqmm | X:1 |
| OE MC & caliper | 25.4 | 506.707 | 48 | 1809.557 | 3.571 |
Based on the table above, compared to the OE Fiero front caliper the Grand Am caliper needs 666.018 cubic mm more volume per mm traveled. The GA caliper uses 961.328 cubic mm more fluid than the OE rear per mm traveled. In addition, those numbers are for just one caliper. The actual need is twice that since there are two calipers involved on each circuit.
What this means is that on the front circuit, the MC piston must move 2.629mm more to make up the extra volume. This is an important issue because the Secondary MC piston only has a few mm of useful travel to begin with. If there is even the smallest loss of fluid then it is extremely easy to bottom out the Secondary piston. Once a piston hits bottom, that's it. If the caliper hasn't reached effective operating pressure, it's not going to and you aren't going to be able to stop.
The situation is even worse when both the front and rear are converted to GA calipers. Using these calipers on both axles will likely squeeze the Quick Take-up bore dry just trying to engage the pads. At the very least, you develop a huge pedal travel before the brakes start to grab.
What about the bigger MC?
I haven't forgotten it. We'll get to that later. First I want to talk about the calipers and other things a bit.
Calipers & Rotors
One of the things you may have noticed in the above table is that the OE rear caliper piston is smaller than the front one. This is not only normal but also desirable. We don't need as much brake on the rear axle as the front. In most cars not only is the piston smaller but the pads and working surface of the rotor are also reduced. No car I know of uses the same front and rear brake setup. (We'll ignore the hand brake just now.) Fiero's use of rotors and pads that are nearly identical on the front and rear is very unusual.
A common belief is that solid rotor = bad rotor design. This is absolutely false. The choice of solid or vented rotor depends on the application. While solid rotors are unusual on the front axle, they are common on the rear axle of many, many, cars. Even very expensive import sports cars often have them. Even NASCAR stock cars use solid rotors on some tracks. Another false belief is that the solid rotor will always run too hot. Actually, solid rotors are required in many applications in order to get the heat up enough for the pads to work properly. Remember that most brake pads work best in a certain temperature range.
You say the word application allot.....
That's because it's the single most important word there is in a discussion about brakes. Before you can make any kind of alteration to a brake system you must understand how the present system works and what kind of driving it was made for. If you're talking about a street driven car then you're looking for different kinds of things than a race only car. The vehicle in question, the brake system, the type of use, and even the driver are all parts of a specific application.
Brake pads
Choice of brake pads is the single most difficult thing to do to a set of brakes. Most people throw any old pads on a car. This is about the worst thing you can do. It's one of the big reasons most people think a car's OE brakes stink.
Remember brake pads MUST wear in order to work. Cheap pads could wear to fast, or worse glaze, fade, etc, because they can't handle heat well. Rock hard pads can actually wear the rotors down.
I usually stay with one of the better name brand pads. The big companies like Ferodo/Wagner, Bendix, etc, have the resources to test things much better than most of the off brands. For a street car good name brand pads are usually the best choice.
Some people have tried various carbon metallic compounds for the pads. You have to be Very careful with these. Many of the "carbomet" products are designed for race applications and they will not work properly when cold. (Some are very dangerous when cold.)
Don't be afraid to try different pad sets. They aren't that expensive. If you think your present brakes are week, try another kind of pad. There are usually multiple types of pads from each vendor. Even a few specialty brake pad makers have stuff for Fiero. I've never felt a need for specialty pads but some people have used them and like them. Expect to pay a good chunk of change for a set of these.
Note: Avoid pads containing Asbestos. Most pads are Asbestos free but try to make sure.
What about drilling and slotting?
These are generally waste management techniques. They can also be a weight reduction technique. They ARE NOT cooling aides.
On most street driven cars they will have little or no benefit. Unless drilling and slotting are done very carefully, the rotor could be dangerously week after machining. On race applications, drilling and slotting are still used with carbon based pads due to the heavy dust generation of that type of pad. Drilling is popular with drag racers because it cuts weight.
Back to "upgrades" of the OE hardware.
Generally, it's a bad idea for most people to be changing their OE brake system, especially based only on some scant directions off the Internet. The "Grand Am Upgrade" is a perfect example of this. This upgrade has some major issues that are not addressed well or at all.
One problem with this upgrade, which we mentioned above, involves master cylinder volume. To fix this, various articles recommend using a 28mm MC off a full size Blazer. This will fix the volume problem but can create others. For example, if the Blazer MC is used with the OE rear brakes then you loose allot of power from the rear calipers.
If we look at the math again....
|
Caliper Ratios for Blazer/Grand Am "Upgrade" vs OE Fiero |
||||||
|---|---|---|---|---|---|---|
|
Setup |
MC diam |
MC area |
Cal diam |
Cal area |
Piston Ratio |
Change vs Stock |
|
Front |
mm |
sqmm |
mm |
sqmm |
X:1 |
X:1 |
|
Fiero stock |
25.4 |
506.707 |
49 |
1885.741 |
3.722 |
0.000 |
|
Fiero MC & GA caliper |
25.4 |
506.707 |
57 |
2551.759 |
5.036 |
1.314 |
|
Blazer MC & GA caliper |
28.6 |
642.424 |
57 |
2551.759 |
3.972 |
0.251 |
|
Rear |
mm |
sqmm |
mm |
sqmm |
X:1 |
X:1 |
|
OE MC & caliper |
25.4 |
506.707 |
48 |
1809.557 |
3.571 |
0.000 |
|
OE MC & GA caliper |
25.4 |
506.707 |
57 |
2551.759 |
5.036 |
1.465 |
|
Blazer MC & OE caliper |
28.6 |
642.424 |
48 |
1809.557 |
2.817 |
-0.754 |
|
Blazer MC & GA caliper |
28.6 |
642.424 |
57 |
2551.759 |
3.972 |
0.401 |
|
Warning! Table does not account for effect of the proportioning valve! |
||||||
|
Note: Excel calculations extend to 9 decimals and display is rounded to 3. (Not truncated.) |
||||||
For more math, see download the Excel sheet.
If you put 1 pound into the MC with the OE rear caliper, you get 3.1 pounds out. With the Blazer MC you get only 2.5 pounds for each 1 pound in. When you are talking about hundreds to thousands of pounds of force generated in a brake system, this is a huge pressure drop. This doesn't account for the further loss in the proportioning valve.
When the Grand Am caliper is used front and rear we end up with no bias at all except what ever is provided by the Proportioning valve. This isn't good either in most applications. Even race only applications need front/rear bias or the car becomes dangerously unstable. All versions of this upgrade require resetting the system proportioning and that is a job only very experienced brake mechanics should attempt.
How much pressure are we dealing with?
Well... We'll ignore the brake booster for now. We'll just use a 4:1 pedal for an example. (I'm not crawling under the dash to measure the thing...) (I eventually did measure the pedal when I replaced the bushings. It's very close to 4:1)
With a 4:1 pedal, 100 pounds of force from your foot delivers 400 pounds to the MC piston. 400 pounds X 3.722 (OE front piston ratio) = 1488.8 pounds at the face of the caliper piston. (And you wondered why those things were so heavy....) Since the caliper shell is pushing with about the same amount in the other direction, we have a clamping force of about 2977.6 pounds. If we threw in whatever the brake booster adds to the system, the clamp pressure would be even higher yet. (Actual clamp pressures of 4-5 Tons are common.)
To use the same example on the rear
| Setup | MC Input force x Ratio | Cal piston output | Times 2 | Clamp force |
|---|---|---|---|---|
| All OE | 400 x 3.139 | 1255.6 | X 2 | 2511.2 |
| OE & BMC | 400 x 2.476 | 990.4 | X 2 | 1980.8 |
| We loose of 530.4 pounds of clamp force using the Blazer MC with the OE rear... | ||||
I have a big motor, I need bigger brakes... I race, I need cooler brakes...
You just might. I'm not saying it can't be done. The point here is that there are allot of issues with this that most people are unaware. There may be aftermarket systems but these are designed as full systems. If they retain any of the OE parts, it is because they are designed to do so. (Or at least one would hope they are for the price of them.)
I'm not arguing the fact Fiero OE brakes don't work well in racing. They were never designed for that application. Keep in mind that Fiero was never originally designed to be a sport car. It was built to be a little econo skate to get to work and not look like the rest of the rolling shoeboxes on the road. Notes in the Tech forum indicate the GA brake parts can solve some race braking issues. This article is mainly targeted at the development of street legal and safe brakes.
The work I've done here is a large part of why most of the full systems are so expensive. You can't alter just one part of the system. Every little thing effects the whole system.
In reality, you may NOT need bigger brakes. You may only need different pads or some other "small" change. The Fiero OE brakes can handle normal driving and even some abuse. You can push the abuse envelope with better brake pads. (Example: ThermoQuiet from Wagner.) If the car develops a fade problem in heavy driving or warp rotor(s) than you'd might need an upgrade. Although in most driving, a warped rotor is service problem. Dragging pads from stuck pistons or sliders will wreck the rotors fast. So check your service issues before you do an upgrade.
In most cases, the only reason to change the hardware at the wheels is racing applications that may develop brake fade problems from overheating the parts. Some race applications are actually hurt by installing the GA parts because of the added weight.
Grand Am/Beretta brake "upgrade"
While I agree there are certain problems with the OE brake system, I don't think this brake upgrade is desirable as many people claim. This upgrade is at best RACE ONLY. Cars equipped with the upgrade should not be put into street service until a brake engineer has tested the car using a brake dynamometer and other techniques.
If you are considering this upgrade, dig out all the facts first. There are a number of posts in the forums by people who are not happy with this "upgrade."
I have examined the information and science behind this upgrade and there are major problems. I will no longer support or advocate this upgrade in any way. I will not do it to my own car and I don't recommend doing it to yours.
The front-end only version of this upgrade cannot simply be slapped on the car. Recalibrating brake bias IS NOT a simple issue of installing an adjustable valve in the lines and playing with it until it "feels" right. A setting that works on dry pavement could be fatal on wet. (Most Brake Tech's are NOT qualified for this level of work.)
Other reasons behind this conclusion...
There is such a tiny amount of information on this upgrade. The information available includes none of the science behind the conversion and no reliable test data. It simply lists parts that someone dug out of a book or scrap yard until something was cobbled to fit.
The front upgrade has a number of machining issues that are poorly addressed. Little to none of the information published addresses these issues. I doubt any of the "kits" have either.
The front upgrade has a clearance problem with the caliper support bracket. The usual answer is to grind material from this bracket. This only works on the poorly refinished hub most people are using. If the hub is worked to properly center the rotor and reduce wheel offset then even more grinding of the bracket is required. This can leave the bracket weakened in such a way that it could fail very suddenly during braking. The reality is that these brackets probably need to be replaced not reworked.
If the hub is not reworked to account for the new rotor then the new rotor will be off center and will vibrate. Just how bad this is depends on just how far off center the rotor is. You may not feel it but it will vibrate. Failure to lock the rotor on center can also result in the rotor shifting position between the wheel and hub during braking. The only reliable centering point on the new rotor is the center hole.
Unless the hub face is machined back by some or all the thickness of the rotor hat then the wheels are pushed out by the new rotors about one inch. That creates a number of subtle changes in wheel alignment. New wheels used with this upgrade should have the offset recalculated to return the tires to their correct position. (Before anyone tries to machine the face of the hub to account for this you had better check how much metal is available to machine off without weakening the hub.) How much effect this has depends on the wheels and tires used and how the car is driven.
The new parts add unsprung weight to the car. The Grand Am calipers are cast iron while the Fiero OE calipers are aluminum. The new hub/rotor set for the front is also heavier than OE. Increasing unsprung weight affects ride quality and handling. The increase will require careful consideration when selecting new shocks and struts.
Few people working on brakes actually understand how all the parts work together. Changes made to any one part affect all other parts.
Legal Problems
Sales or use of the upgrade on street driven cars creates very serious legal issues, especially if the rear axle is converted as well. Persons installing or selling this upgrade or cars equipped with it need to talk to their attorneys and liability insurance company. Any car using the upgrade that is involved in an accident is highly likely to result in very ugly lawsuits.
Persons installing this upgrade "because it's cheap" are only fooling themselves. The real cost may only show up after you're in a wreck, are sued in Civil Court, and find your insurance is not going to pay because of an illegal/bad conversion. Even if insurance pays, the maximum pay out is in your policy. Lawsuits can/will ask for more money, especially when they find out you "upgraded" the brake etc.
FMVSS
Federal Motor Vehicle Safety Standards (FMVSS) is starting point. Rules how new cars and many mod/upgrade are design for. NHTSA (USDOT) has ordered many recalls for aftermarket parts/"upgrade" that don't meet FMVSS rules.
Correction: I believe Fiero was actually built to standard 571.105, instead of 571.135 as I originally had here. The hand brake was required in that standard as well but the testing is a little different.
Federal Regulations covering brake systems are very specific and are defined in:
Code of Federal Regulations
Title 49--Transportation
Chapter V--National Highway Traffic Safety Administration, Department Of Transportation
Part 571--Federal Motor Vehicle Safety Standards--Table of Contents
Subpart B--Federal Motor Vehicle Safety Standards
Sec. 571.105 Standard No. 105; Hydraulic and electric brake systems.
The standard defines the entire automotive brake system and the testing requirements. Vehicles that do not meet these standards are considered legally inoperative. There are huge fines and other penalties for shops that intentionally disable required systems such as the hand brake.
S5.2 Parking brake system. Each vehicle with a GVWR of 10,000 lbs. or less and each school bus with a GVWR greater than 10,000 lbs., shall be manufactured with a parking brake system of a friction type with a solely mechanical means to retain engagement, which shall under the conditions of S6., when tested according to the procedures specified in S7., meet the requirements specified in S5.2.1, S5.2.2, or S5.2.3 as appropriate, with the system engaged-
(a) In the case of a vehicle with a GVWR of 10,000 lbs. or less, with a force applied to the control not to exceed 125 pounds for a foot-operated system and 90 pounds for a hand-operated system;
It's not illegal, at least federally, to improve the brake system as long as the system still meets FMVSS requirements. The 4 wheel Grand Am upgrade clearly does not meet these standards and is illegal for street use in the U.S. because it eliminates the parking brake. The front only upgrade would also be illegal if the car can't pass all the tests in the required standard.
How does this applies to State Laws?
States maybe write laws/rules/regulations that are much different that FMVSS, based on FMVSS, even copy FMVSS. You needs to read your State rules.
You need to check State's law and DOT/DMV rules/regulations. In some States, DOT regulates what is street legal or not similar to NHTSA and FVMSS regulations. Others have that info in the state's laws.
If legal locally, drive in another state then that state laws can apply to you when driving there. Could be big problems after a wreck in another state.
But it passed inspection... I don't have inspections...
Many states don't have inspections or have inspections that don't test the parking brake. Just because you can get by a State inspection doesn't make it street legal. You can still face criminal and civil penalties for upgrades that don't meet Federal/State standards.
Examples:
Delaware Inspection doesn't look at parking brakes but DE Rules says: Parking or Emergency Brake - Must stop vehicle within a distance of 54 feet from a speed of 20 miles per hour. (dmv.de.gov vehicle equipment)
Delaware and some others, Inspection does look at normal brakes but uses skid type dyno for inspection. This type uses 4 skid pads you drive on and stop. Screen shows results on each wheel. If Screen shows Weak/no brakes on 1 wheel/axle = inspection fails. Official DE Rules? Foot Brake - Must stop vehicle within distance of 20 feet from a speed of 20 miles per hour on dry pavement. Brakes must be adjusted to work evenly on opposite sides of vehicle. (Same page as above)
NY Inspection shops look under the car and even take off wheels looking for brake issues. Worn/Dead/Missing brake parts = inspection fails.
Can I use "Line Locks" as a Parking Brake?
No. These items use Hydraulic pressure to hold your car.
Why:
- All Line Locks are NOT street legal for a parking brake. See FMVSS 571.105 above.
- Line Locks are made for Temporary Use with the Driver in the car.
- Extended use of Line Locks can leak down and cause leaks in the calipers. Brake seals are not made for constant pressure that Line Locks uses. Extended Use mean more than a few minutes of use. 10-30 minutes and many brake systems have trouble keeping pressure up.
Where did this brake upgrade come from?
As best I can tell, it was developed by a race project. In that application, the upgrade has definite advantages over the OE solid rotors. (There is one post in the Tech forum that verifies the thermal advantage.)
There is no evidence on any of the sites touting the upgrade that it has been properly tested for street use.
Are there solutions for the mechanical problems?
It may be possible to address the mechanical problems but it won't be half as cheap or easy as many people claim. Fixing the problems for the front axle is mainly an issue for a machinist. It will likely require a new bracket for the caliper and/or a new hub. The rear axle version of this upgrade can never be made legal for street use.
I think a big issue is that the GA rotor needs to be replaced with one just like it but having a shorter "hat." This would allow the hub to be better machined and avoid clearance problems with the bracket and stone shield. From what I can see, the alternate hat looks to be between 1/4 to 1/2 inch shorter. I don't have all the data needed to get an accurate number at this time.
Or maybe "Concentric Rings" like Bloozeberry uses on Corvette rotor upgrade? Bloozeberry note is an example. GA needs different rings. Source of rings? Don't know. In this thread I posted dimensions to make/buy them. But then you still have the problem to center the wheel... You can try use "Lug Centric" method. In Lug Centric method:
- Need Cone lugs (Turner lugs and Lugs w/ washer might not work.)
- Wheel must not see any load while mounting
- Torque lugs by hand using a torque wrench
At minimum, all lugs hand tight in star pattern, torque 50ft/lb in star pattern, then torque to spec in star pattern. (Usually around 100ft/lb for alloy wheels.)
Another item commonly sited is that the GA rotor is vented. A problem with that is the rotor is presently installed so close to the stone shield that the air flow is mostly blocked. I'm sure there is some flow but I doubt it's as much as many people think. Fixing this involves altering or replacing the OE stone shield.
Another option...
No, I still don't recommend this method either because of mechanical problem above. At least this method has the parking brake.
To use GA front, Seville Rear, and Blazer MC.
This method mainly gives you vented rotors, saves parking brake, Maybe a very small Hydraulic advantage, but not much else. Front GA has same problem as always... The Excel sheet below has been updated to reflect rear caliper change.
Does anyone make a "good" version of the Grand Am upgrade? Even just for the front?
Not that I've seen. All the "kits" I can get any details on have been created by simply following the instructions available online. The comments made by several people who've purchased the kit versions tend to back this up. A number of comments indicate the people wishing they had not done the upgrade either by kit or on their own. I believe it is possible to create a better kit but it's very unlikely to happen. There is much more involved here than simply chopping down the OE hub/rotor to fit the GA rotor to it. I doubt there is enough demand to justify the development cost.
Can I Keep OE MC with Front GA "upgrade?"
Some have kept the OE MC and rear brakes and upgraded only the fronts, But...
First, you need to carefully understand how Quick Take-up Master Cylinder because the Quick Take-up feature can hide problems.
Then read or reread "How does this work in Fiero?" above.
Two big problems:
- Some to most owners with this setup have run out of fluid flow from the Secondary MC piston. Running out of fluid flow stopped any more pressure generated from the MC. Big GA caliper piston and Quick Take-up Master Cylinder hides this problem in normal driving.
- If you do not hit the Secondary MC piston that limits travel now then you have nothing left as reserve if/when later you have clearance issues or have minor seal problem with GA front brake.
Can you test this problem with Brake Pressure Gauges?
Not really. Problem is that Normal gauges need some fluid flow and likely voids the test. Example: Most gauges have air inside and very hard to purge/bleed the tube. More as to why use Google: bourdon tube.
Can I use GA or Seville to upgrade the rear brakes only?
No... Using GA, or Seville, for a Rear Only "upgrade" = BAD idea. Wishful Thinking doesn't make a bad idea good. Internet has allot of bad ideas.
Why a bad idea?
Using bigger rear brakes will upset the car's Brake Bias (OE or bigger MC doesn't matter.) and can causing the car to spin, depending on road condition or not. Bad Brake Bias in a car can cause spin-out even on Dry pavement. After you spin then you hope you hit nothing, other Drivers don't hit you, etc. See this thread in Totally O/T. For Bias math, download the Excel sheet.
I can use a new Prop Valve...
No, covered in the same thread above. A valve set wrong or fails and have a bit of rain then easy to spin out. Aftermarket prop valves can fail with no warning.
What about a different Master Cylinder?
(Upgrade MC with OE calipers.)
No-one is looking at alternate MC anymore... Some test said alt MC can't move enough Fluid and give no reserve capacity. Using a Blazer MC with OE calipers will make brakes weaker, not stronger. Look elsewhere.
One thing no one seems to have noticed is that an OE Grand Am install actually has a smaller MC than Fiero. This should raise a bunch of questions by itself. (OE Grand Am is 24mm main bore.)
One reason we can't use the Grand Am MC is that, like all other GM front wheel drive cars, the Grand Am has cross fed brakes with one front and one rear wheel on each circuit. Fiero has front on one circuit and rear on the other. In addition, the Grand Am is rear drum. Drum slave cylinders don't use as much volume as disks. So you likely can't easily convert a GA to 4 wheel disk and keep the original MC. The reason the MC in the GA works is because only one front caliper is on each MC piston. The GA MC will not work if you try to put both calipers on the same circuit.
The Fiero Store sells a "big bore" master cylinder (Blazer MC). Increasing the MC bore diameter REDUCES fluid pressure. It will always make the brakes weaker not stronger! When installed on an otherwise stock Fiero it will seriously reduce brake system performance. You DO NOT want this thing on a stock Fiero!
The purpose of the large bore is to increase fluid volume. The large MC is needed to make up for the vastly increased fluid demand of the larger caliper pistons. In this setting the stock MC can never deliver the volume of fluid needed.
The rest of this section has been removed. Reason: Out Of Date and Cannot be made safe. Even for racing, its a bad idea. I will not answer any questions on this subject.
How can I get more volume from the OE MC?
Warning! This section is out of date.
You must keep the rears properly adjusted if you do this but
you won't have the reserve capacity to make up for sloppy pad clearance.
The Problem is that the rear calipers will never stay in adjustment most of the time.
This means that most people should not use this method.
"Better" option, if you are going to use GA fronts then use Seville rears above.
This section has been removed. Reason: Out Of Date and Cannot be made safe. Even for racing, its a bad idea. I will not answer any questions on this subject.
Proportioning
Very important note... Most OE prop valve, like 84-87 Fiero uses, doesn't work in most stopping, only use in panic stop settings. Most people think all bias is done by a valve but their wrong most times. Prop valve think regulator and activate until 800-900PSI from MC. Prop valve doesn't activate in normal use. Many other ways to give you Bias, Fiero and most GM models included. If only valve to give you Bias then when valve is dead, Bias is dead... and likely only warning is car gets spinning around.
This is a delicate topic. A tiny change to the prop valve can have a major effect on the brake system. To make this even more difficult, a setting that works on dry pavement may be horrible on a slick road.
This isn't just an issue of adding a new prop valve in the rear brake circuit. You may have to work on the OE valve as well. Why? Because when you boost front brake performance, you may actually need less rear brake restriction than the OE valve is set for, not more like you would have with an added valve.
The preferred way to change proportioning is to recalibrate the existing valve. This will keep the safety bypass in the balance block operational.
If you do use a new valve, make sure it is a high quality part. This is one of those devices where you get what you pay for. Keep in mind that a new valve will eliminate the safety bypass feature of the balance block. This means you won't get full power at the rear wheels if the front brakes fail.
When you do install another valve, the the new valve must be after the balance block. The MC must always have a clear run to the block or you will have the brake light on. To give the best results a new prop valve may require gutting/altering the OE valve. This will usually happen when you want to run some prop valve but not as much as OE. (Leave the Balance portion of the block alone!)
The final setting is going to vary according to each driver's needs and the specific configuration of the car. I can't tell you just how to set this. What ever you decide on, the rear brakes must not lock before the front.
But my rear brakes won't lock up. GM setup for Prop valve must be wrong.
No. See rear brakes for more info.
TEST, TEST, and Test some more...
You can't over test a change to the brake system!!! Your life and many other people's depend on fully testing the system. This isn't a simple matter of driving along and slamming on the brakes, although you do have to do that... You have to test it on dry and wet conditions. You have to test in turns, on slick areas, and even different kinds of pavement. Testing on dirt isn't a bad idea either. Driving on loose dirt isn't much different from snow and ice.
One tool you may want to get for this work is a pressure gauge for the brakes. This will let you get the actual pressure in the front and rear circuits. Wilwood has a one. You could probably make one if you can find a suitable gauge. I imagine the hard part is figuring out how to get rid of air in the gauge.
If you get lucky, you can talk someone into letting you run it over a brake dyno. What in hell is that? It looks like a vehicle scale with 4 separate top sections. You drive onto it and hit the brakes. The pads feed up to a measuring station that tells you what each wheel is doing during an actual stop. (Delaware uses these during vehicle inspection. I love them. If you fail, you know right quick where to start looking for the problem.) If your brake balance is way off front to rear, this thing can tell you right away.
Where else should I read?
Before you consider any brake upgrade, see this thread in Totally O/T. Read all the comments in the thread "Brake Upgrade Math" carefully.
Some of the Excel sheet used for the hydraulic math has been pasted above but you can download the actual sheet. It has much more infomation and covers Seville rear setup.
Hot Rods USA has a very usefull Brake FAQ. (they also cover DOT5 fluid issues.)
Wilwood Engineering has a bunch of stuff but it's a little hard to navigate.
Baer Racing is another very well known company. Reading the last several pages of their application and fit guide is strongly recommended.
Also, try digging in the archives at Motor Magazine and Motor Age. These trade publications go into more depth than most consumer articles.